Giants I3D Exporter Explained: Difference between revisions
No edit summary |
No edit summary |
||
| Line 27: | Line 27: | ||
|Seperate panels for different use cases | |Seperate panels for different use cases | ||
|} | |} | ||
=== Export Panel === | === Export Panel === | ||
This is the panel where all the export settings are located | This is the panel where all the export settings are located | ||
[[File:I3dExporterPanelExport.png|thumb|Giants I3D Exporter. Export Panel|none]] | |||
==== Export Options ==== | ==== Export Options ==== | ||
{| class="wikitable" | {| class="wikitable mw-collapsible" | ||
!Attribute | !Attribute | ||
!Explanation | !Explanation | ||
| Line 57: | Line 56: | ||
|When this is checked the I3D Exporter will run a operation to save the i3d to binary format, so you don't have to manually do this later | |When this is checked the I3D Exporter will run a operation to save the i3d to binary format, so you don't have to manually do this later | ||
|} | |} | ||
==== Shape Export Subparts ==== | ==== Shape Export Subparts ==== | ||
Panel related to shape/mesh data | Panel related to shape/mesh data | ||
| Line 80: | Line 78: | ||
|Will Export bones (armatures) and vertex groups if checked | |Will Export bones (armatures) and vertex groups if checked | ||
|} | |} | ||
==== Miscellaneous ==== | ==== Miscellaneous ==== | ||
===== Verbose ===== | ===== Verbose ===== | ||
Revision as of 21:26, 2 April 2023
Explanation of what everything in Giants I3D Exporter does
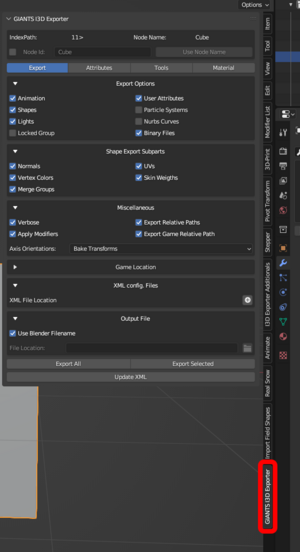
Giants I3D Exporter location
Every now and then there is questions about where the I3D Exporter is located in the "Properties Panel" in the 3D viewport. If this side bar is hidden you can simply click on "n" and it will appear.
Top Section of the exporter panel
| Attribute | Explanation |
|---|---|
| IndexPath | Will show you the index path for the active selected object and this index path will also be the same in Giants Editor |
| Node Name | Is the name of the current active selected object |
| Node Id | Is for generating i3dMappings for your objects, select a object, check the box and click on "Use node Name" (can also write a custom name if you want) IMPORTANT: To be able to export the i3dMappings you would also need to add a XML file to the "XML config. Files" panel |
| Export, Attributes, Tools, Material | Seperate panels for different use cases |
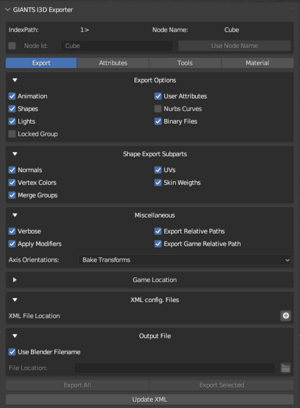
Export Panel
This is the panel where all the export settings are located
Export Options
| Attribute | Explanation |
|---|---|
| Animation | When animation is enabled the exporter will export the animation data in the blender scene |
| Shapes | If this is unchecked all your shapes (meshes) will be exported as transform groups |
| Lights | If this is unchecked all your lights will be exported as transform groups |
| Locked Group | If you check this it will lock the root element of every hierarchy. Perhaps you don't know what this is, it make most sense to use this when for example creating buildings for a map. When the locked group is enabled and the hierarchy in Giants Editor is "closed" you can click on any child object in the viewport and it will select the locked group (root object). |
| User Attributes | When this is checked the user attribute data will be exported |
| Nurbs Curves | When this is checked it will export the curves to i3d as nurbs curves, if its not checked it will export curves as transform groups |
| Binary Files | When this is checked the I3D Exporter will run a operation to save the i3d to binary format, so you don't have to manually do this later |
Shape Export Subparts
Panel related to shape/mesh data
| Attribute | Explanation |
|---|---|
| Normals | Export Normals if checked (should always be checked) |
Vertex Colors |
Export Vertex Colors if checked |
| Merge Groups | Export merge groups if checked (if you have any) |
| UVs | Will export the object UV layer(s) if checked |
| Skin Weights | Will Export bones (armatures) and vertex groups if checked |
Miscellaneous
Verbose
Will print information to the system console (location: Window --> Toggle System Console)
Apply Modifiers
Applies modifiers if checked
Game Location
This is the place you set the location of your game install (for example: D:\steam\steamapps\common\Farming Simulator 22\)
If this is not set you will not be able to export
XML config. Files
Here you can add the xml file for the vehicle you are currently working on and when you export to i3d the content of the <i3dMappings> will be updated with the new i3dMappings you have added in Blender
Output File
Here you can either choose to export to a custom location or you can enable "Use Blender Filename" this will export to the same lcoation as the blender file.
Export Buttons
Export All
This will export everything in the whole blender scene (except for objects and its children with suffix _ignore)
Export Selected
Export selected will export all the selected objects in the scene. Note: Its currently a bit broken, when you have empty object type, it will duplicate the hiearchy in the i3d file.
Update XML
This will update the <i3dMappings> in the xml file you have added and will not export the objects in the scene
Attributes
Panel containing all the different attributes you can have on your object
Loaded Node
Will display the name and the index path of the object you have loaded


